Sunday, June 12, 2011

Boarding pass please part 2

Now that the boarding ladder was finished I had to mount the ring/hooks on the side of the boat. So I made a simple jig and some backing blocks with the T- nuts in them. Worked well.

From Update 6-7-2011


From Update 6-7-2011


Mounted and Installed.

From Update 6-7-2011


Update on the Ladder varnish.

From Update 3-15-2011

Boarding pass please.

The new boarding ladder. Took me almost six months to get the hardware. Good thing I was in no hurry. I was glad to get it actually. Instead of a bunch of picture, I made a slide show. You can look at them individually on Picasa.

New Aft Hatch - Finished

Finished aft hatch. A lot of work but it's done.
From Update 3-15-2011


Painting and varnishing.

From Update 3-15-2011


From Update 3-15-2011


From Update 3-15-2011


From Update 3-15-2011


From Update 3-15-2011


Installed. Ignore the dirty deck. Still to be delt with.

From Update 3-15-2011

Man made breeze

I needed a bunch of fans for the boat. If you have priced these recently you will see they are not cheap, price wise anyway. So I said " I think I'll make my own". Here is how I did it.
Find the fan you would like to use. I had 2 on hand, and found some more on Ebay.
From Update 6-8-2011


Measure it then figure how to mount it. I wanted a nice teak mounting to match the rest of the boat. I also built one with mahogany and sapele wraps. These I used a spray urethane on them. The teak ones I oiled.

So make the wood bits first. I used some scrap to test.

From Update 6-8-2011


The holes are for the swivel bolts and nuts. I used nylon bolts and wing nuts from Lowes and Home Depot. Add the rubber washer to hold it from turning. You do not need to tighten them tight as they hold real well.

From Update 6-8-2011


Glue them in with some epoxy (J-B Weld). Then run thru the router to clean them up.
From Update 6-8-2011

From Update 6-8-2011


Wire in the switch then glue them up. Give them a final sand then oil or add desired finish.
Also make Aluminum brackets.
Clamp available here.

From Update 6-8-2011


From Update 6-8-2011


Finished fan.

From Update 6-8-2011


You could make all the cuts for the wood on a table saw, but I used a router for the channel. Also the switch came from Radio Shack. I put it in one of the screw holes for the grill. Drill a half inch hole opposite to insert the switch. This hole is where the wires will come back out.

Friday, February 11, 2011

As they say On Monty Python ........


"And now for something completely different"


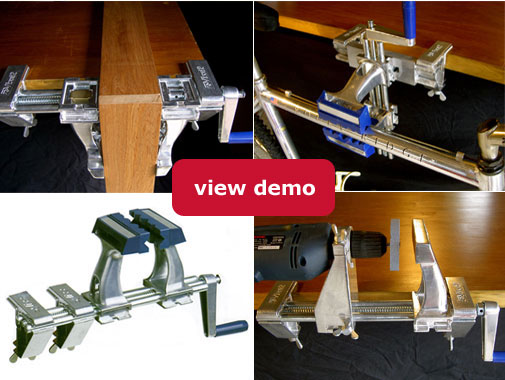
The new tool in the shop. Small but very useful. I wished I bought this before. I got it on ebay ( of course), But actually came directly from the importer.

What is it already!!!

The Swiss made Zyliss vice. The z-vise2 actually.


Check it out for your self.

http://www.homeshow.co.nz/zVise_overview.html

In the US.

http://www.advmachinery.com/p-105-z2-portable-clamping-system.aspx


Here I'm using it on the drill press.
From update-2-11-2011


Actually found a pic of one on a boat. Which is what I really bought it for. I wanted a tool I could use in the backwoods of someplace in the world. Mostly none rusting magnesium aluminum.

http://www.boatus.com/cruising/ithaka/200406-15.asp

How to use.


Part 2

New aft hatch..... Finally

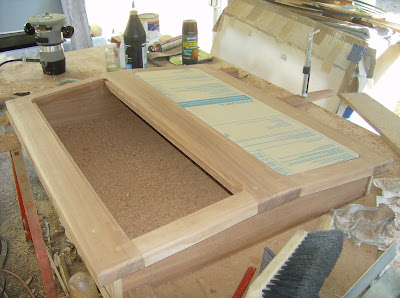
The Tiburon 36 was originally designed with an aft hatched that slid open toward the center of the boat. The idea was good in that made for a low profile hatch that stayed out of the way and was easy to use. Now for the problems. They leaked badly. The runners are in the way. It will not funnel a breeze below. And most important, it is weak if you were to walk on it. It could collapse and you would fall into the aft cabin. I think this design would work if the hatch was redesigned to be stronger and could be made leak proof. The last item would be fairly hard to do, especially in the case of being pooped by a following sea. This may not seem likely, but in a blue water boat, it has to be expected. So something else is needed. The problem is that the hatch opening is wider than it is long. Making a hatch look right will be tough. I looked at this for a couple years. I really wanted to do this differently, but I did like the original's low profile. I could have bought a hatch -- that would be costly and not fit the boat -- without changing all of the hatches out.

The original hatch.
From Tiburon/Cabo Rico 36


This is from a different boat. See how they removed the runners. I removed mine and then removed the molded runners in the deck.

From Tiburon/Cabo Rico 36


Notice the difference between the hatches. Mine has molded rails in the deck while the lower one has none. It relied on teak strips for the runners. They have been removed in this photo. That shows that they realized that this hatch needed improvement.
Now for the new hatch. To do it right, I needed to add a lip on the inside of the opening to help provide for alignment of the hatch and stop the water. This will give me two mating surfaces for gaskets.

Because the opening is wider, the hatch will sit cross-ways instead. I wondered if I would like this or if it would look correct or alright. After doing some research, I noticed this has been done before, so if it's alright for them, it's alright for me. I could have built this so the ridge follows fore to aft, but it would be weaker. This hatch is made from one 8"x 1 -1/8" x 12' board. The wood is Sapele, a relative of mahogany.

Speaking of mahogany, I have about a hundred board feet of genuine Honduras mahogany for sale. All 5/4 and random widths. Mostly 6-10" wide, but I have two very wide boards at 22" and 27" wide. $1,000 for it all. Been in storage for over 30 years. Very hard, nice furniture grade wood. Hate to sell it, but don't need it.

Ok, for the new hatch. Fitting the Plexiglas.

From update-2-11-2011


Finished --assembly that is. Plex will be installed after finishing. More pics then.

From update-2-11-2011

Saturday, January 29, 2011