Thursday, May 31, 2012

Making new fiberglass parts

  So, you want to enter the world on making parts out of fiberglass or FRP.
Easy right? Maybe, maybe not. The easy part is making the finished part. The hardest part is making the plug. Plug? Whats a plug? The plug is a representation of the actual part you wish to make. It may be complicated or simple. Either way, it will involve a lot of work. In order of hardest to easiest to do: plug-mold-part.

  First you need to Either draw up the part or build it. Then you have to allow for shrinkage based on the resin you will use and thickness of part. These formulas can be found on the internet.Then you have to allow for a way to make the part removable from the plug and mold. So relief has to be planed in or a take apart mold must be made.

  Take a look at some part on your boat to get an idea of what I mean. By the way you might want a shiny part, so there will be a lot of polishing. A little secret to get this shiny is cover it in several coats of resin so you have something to shine/polish. Do this after all tooling work and sanding is done.

  So, here I am going to show an example of a part I needed. I need to make a ring for the bronze ports in my aft cabin. I could not find bronze rings that would fit, so I made some in FRP. Here is a pictorial of the process.

Make a plug.

From Update 4-3-2012
  You will notice that only the place that is shiny is the actual ring, the rest of the plug is just to hold the ring and provide a flange.

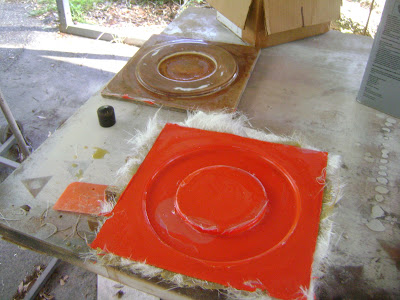
Then make the mold the part will come from. Provide some support for it as it will be used a lot if you your going to make multiple parts, which is the beauty of this process. This will be a time consuming project.


From Update 4-3-2012
What looks like something peeling from the inside of the mold is just mold release. It washes off. Next we trim it up and check it. The red/orange gelcoat is a tooling gelcoat. It is a little tougher, made for repeated usage. Remember you may at some point need to repair your mold. If it becomes really bad then make a new one from your plug. ALWAYS save your plug and use care when storing it. Then apply several coats of wax to it and mold release (PVA). This was also done to the plug.

Pick your gelcoat color then add your cloth and resin and make a part. Note: your part will have a much nicer finish if you spray your gelcoat. Buy a cheap gun from Harbor Freight.


From Update 4-3-2012

The white ring at the bottom is the finished part. Later I will show them installed.

From Update 4-3-2012

Hatch Screens

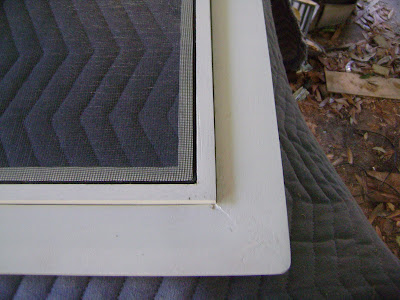
Wanted some new hatch screens for the head and aft cabin. So here is what I did. Nothing new really.

From Update 5-2-2012

New packing for the rudder

   When installing the engine, I needed to replace the old prop shaft with a longer one. I had anticipated this and had a replacement one on hand. Even though there appears to be a cutout in the rudder where it looks as though the shaft will slide in with out removing the rudder, it will not slide past. So, I had the remove the rudder. Not near as hard as I imagined it would be.
   If you have to do it, here is how. First remove the steering cables from quadrant, then remove quadrant (4 bolts), then loosen a little the 3 bolts/screws that hold down the packing in the packing gland. On the outside place something under the rudder to keep it from falling out when you remove the rudder bottom pivot. I used a jack so I could lower it slowly out of the hole. You will not need to dig a hole under the rudder to gain room. You should have plenty of room if your boat is blocked up as normal, with about 12 inches under the rudder. Installation is the reverse. I picked this time to replace my packing and cleanup and re-bed the lower pivot. I did not take a lot of pics of this process. It appears that the packing gland for the rudder shaft is something that was made in house by Cabo Rico. I also added a grease zerk to the lower pivot point to make it easier to re grease.


Tuesday, December 20, 2011

Engine Install

   Finally got the engine installed. I'm very close to done. It had taken about 10 minutes total to get it lifted in and sat on the engine beds. That includes putting the outriggers down on the truck. I got my wife to take the pics as I was a bit busy. All the work of getting the engine beds aligned earlier last year paid off. I had it aligned to .005" in about 15 minutes. Bolted down and prop shaft and prop fitted in about an hour. Can hardly believe it went so well. Scary.


From Update 12-12-2011-engine


From Update 12-12-2011-engine


From Update 12-12-2011-engine


From Update 12-12-2011-engine


From Update 12-12-2011-engine


From Update 12-12-2011-engine


Then I cleaned up the connections and aligned and bolted it up.


From Update 12-12-2011-engine


Cover everything in Lanolin so I can unbolt it later. DO NOT put it on the shaft were the flange goes on. Don't want it coming off.


From Update 12-12-2011-engine


From Update 12-12-2011-engine


From Update 12-12-2011-engine


From Update 12-12-2011-engine


Great Tip

Do you hate cleaning barnacles off your propeller?
Once cleaned, just cover with anhydrous lanolin. It's fairly cheap and stays put. It can be applied under water and is totally Eco friendly. If you use your boat you will have to reapply. Not sure how long it will last, but it's fairly cheap and it only takes a little. It is grease made from sheep's wool. Just warm up the container to make it easier to apply. Side benefit is that it will make your hands nice and soft.

Example of someone else that uses it.
http://my.boatus.com/forum/forum_posts.asp?TID=64876&PN=11

Example of where to buy.
http://www.wholesalesuppliesplus.com/ProductDetail.aspx?ProductID=3163&ProductName=Lanolin+Butter+(Anhydrous+Lanolin
and,
http://www.ebay.com/sch/i.html?_nkw=Anhydrous+Lanolin

From Update 12-12-2011-engine

Tuesday, November 8, 2011

In The Bilge. The Sump.

I needed to add a separate sump to our grey water system. I have a store bought sump from Rule in the forward end of the bilge for the head and shower, but needed one to handle everything else including it. At a $100 bucks or more for one of these plastic boxes, I figured I could make one for a lot less.
Here is how I did it. You can build one too. It's fairly simple. I must add I had some scrap Plexiglas already. I bought the 500 gph bilge pump on ebay. The rest was scrap pieces of marine plywood.

Box measure 11x11x6 inches. It is 1/2 inch ply with 3/4 x 1 inch around the inside for a lip to help seal it and give a place to mount the bolts. The plastic screen inside is actually from a craft store. It is used for some kind of needle work.

Build the box. Then give it several coats of thinned epoxy inside and out. Save money, Don't buy CPES epoxy, just cut your already mixed epoxy with some MEK (NOT MEKP), thin till it's just a little thicker than water, almost half and half mix. MEK is just like Acetone, but evaporates much slower. Let it cure between coats, but put the first 2 coats on while still green. Sand for the last coat and thin it only a little or maybe not at all. You'll know you have enough coats when it is very shiny when finished.

Side note; this little trick will help you fix rotted post and the like without buying special epoxy. I actually apply it to porch post and columns before installing them. Then they never rot.

I used 1/4 inch bolts for the lid. Insert them as you make the box.

From Sump


Fit Plexiglas lid.

From Sump


Install pump and float switch.

From Sump


Install all the fittings in the box and screen plus the fuse holder outside.

From Sump


From Sump


Then install it. I eliminated 12 thru hulls with these two sumps. Now I only have 3 thru hulls.
I mounted it to the bilge with some stainless brackets I had. Screw them to the side of the box, make some pads that can be epoxied to the bilge , with bolts so that the whole thing is removable.
It is under the engine, but hopefully it will be somewhat accessible.

From Sump

Monday, November 7, 2011

Bring on The Cold

After looking at many different options for heat on the boat, I decided in the end to build our own.

Many folks seem to want a nice little wood stove on their boat, but there are no plans I could find and the small cast iron ones that are available or either expensive or appear to be cheaply constructed.

So. I designed my own. For the main items I had a local welding shop use their plasma cutter to cut out the parts. The rest I hand made.

From Update 3-2-2011 Wood stove


The Grate I could have made easily, but I let them as it sped up the process a little.
The entire Stove was welded with a small TIG Process torch. TIG is easy, just takes a lot of practice to be good. Although in these next few pics I actually had started welding with my MIG welder. It does not like 1/4 inch steel, so I rewelded the door and box with TIG.

I next assembled the Box and the door.

From Update 3-2-2011 Wood stove

From Update 3-2-2011 Wood stove


From Update 3-2-2011 Wood stove


You will notice the rails below the grate, that is for the stainless ash pan.
The door has a cast bronze damper I ordered from Washington state. The damper is mounted on a stainless steel bolt that is welded to the door. I cut the bolt head off.

From Update 3-2-2011 Wood stove


Next I welded the hinges on and the feet on the bottom plate and the smoke stack connection on the top plate. This pic is with it sitting together but not welded. The hinges is 1/4 inch rod with 1/8 in x 3/4 inch strap bent around the rod and welded to only one part of the set. The door is removable only when opened fully. This is a design feature.

From Update 3-2-2011 Wood stove

From Update 3-2-2011 Wood stove


Next I needed to weld the top and bottom on and then make the sea rail.
The sea rail is a piece of stainless steel strap 1 inch x 3/16 I believe. It is welded to (4) 3/8 inch stainless steel bolts.

From Update 6-8-2011 Wood Stove

From Update 6-8-2011 Wood Stove


I had to machine the sea rail mounts. This is before and after and also it was polished.

From Update 6-8-2011 Wood Stove


Then weld it all up. This was the hardest part to weld. Very little room to get to it. As you probably guessed, it bolts on, so it is removable.

From Update 6-8-2011 Wood Stove


Now I had to make the part that will make this stove efficient. This part really should be remade as it does not look like it should, but I don't have time or money to re do it at the moment. It will work though.

From Update 6-8-2011 Wood Stove


Last but not least I created a door catch/lock.

From Update 6-8-2011 Wood Stove


Now to test it.

From Update 6-8-2011 Wood Stove


Yes it boiled water fairly quickly.
Now to clean it up and finish it with a extremely high heat paint anf some polishing.

From Update 6-8-2011 Wood Stove


From Update 6-8-2011 Wood Stove


From Update 6-8-2011 Wood Stove


A 12 inch ruler for size. The fire box is only 9 inches square.

From Update 6-8-2011 Wood Stove

From Update 6-8-2011 Wood Stove

From Update 6-8-2011 Wood Stove


And finally in it's install location. I don't have it bolted to the shelf as of yet.
From Update 6-8-2011 Wood Stove

From Update 10-22-2011


I hope you all enjoy. Plans and precut plates may be available. Email me for more info.

***UPDATE***

 Please include your email adress if you want me to reply. I can not reply to you here. I have alot of folks asking for plans for the stove, and yes I have plans for sale. We are also thinking of building these for sale. Great for boats or Tiny houses.
From November 7, 2011