Wednesday, September 21, 2011

Spice up your Life

I needed to build a spice rack. So I got some spice jars to see what heights and depth I needed. This is what I came up with. Sorry no construction photos as I was busy building other things.
From Spice Rack


From Spice Rack


Finished Rack in place. Just need to screw it home. It actually does 2 jobs as it hides the deck/liner/bulkhead joint to. Also you can see my electric fan is installed. The gage you see by the fan is for pressurizing the kerosene stove. I built the bracket as I could not find one. Untested as of yet. Hope it works.

From Spice Rack

Monday, July 11, 2011

The Cover up.

The Cabo Rico has a lot of these oblong holes in it. Most are trimed in teak rings, and I have had to make some new ones to replace the old ones. Well there was one over the nav station, which I thought was strange. It gave access to some wires and that was all. I didn't like the look of an open hole over my head, so some creative hatch making was called for.

Oval holes.
From Update_10_30_07


I did see an idea for a way to build a hatch that would work. It was plastic and only round. So I needed to build an oval one. Here is what I did.

I removed the trim ring. I cheated a little and used the trim ring to get the inside measurements, then I glued up two boards, drilled a hole for the 1\4 inch bolt, used a forstner bit to recess the knob I was going to make. I then used a hole saw to cut the knob, sanded on a belt sander the finger grips. On the inside I made a cross piece that will press down on the hole edge. Then added two pegs to the back to prevent the cross member from spinning. I had to rough up the threads on the bolt a little to make it turn the cross member. If I didn't, then when I opened the hatch, the cross member would not rotate out of the way. The bolt was epoxied into the knob. When closing it, the cross member will hit the pegs and not spin, instead it will tighten down. One could make this fairly water proof with an o-ring for the knob and some silicon in a bead to seal the rim.

The parts.
From Update-8-17-2010


The Backside.
From Update-8-17-2010


Assembled.
From Update-8-17-2010


From Update-8-17-2010


In Use.
From Update-8-17-2010


From Update-8-17-2010

Sunday, June 12, 2011

Boarding pass please part 2

Now that the boarding ladder was finished I had to mount the ring/hooks on the side of the boat. So I made a simple jig and some backing blocks with the T- nuts in them. Worked well.

From Update 6-7-2011


From Update 6-7-2011


Mounted and Installed.

From Update 6-7-2011


Update on the Ladder varnish.

From Update 3-15-2011

Boarding pass please.

The new boarding ladder. Took me almost six months to get the hardware. Good thing I was in no hurry. I was glad to get it actually. Instead of a bunch of picture, I made a slide show. You can look at them individually on Picasa.

New Aft Hatch - Finished

Finished aft hatch. A lot of work but it's done.
From Update 3-15-2011


Painting and varnishing.

From Update 3-15-2011


From Update 3-15-2011


From Update 3-15-2011


From Update 3-15-2011


From Update 3-15-2011


Installed. Ignore the dirty deck. Still to be delt with.

From Update 3-15-2011

Man made breeze

I needed a bunch of fans for the boat. If you have priced these recently you will see they are not cheap, price wise anyway. So I said " I think I'll make my own". Here is how I did it.
Find the fan you would like to use. I had 2 on hand, and found some more on Ebay.
From Update 6-8-2011


Measure it then figure how to mount it. I wanted a nice teak mounting to match the rest of the boat. I also built one with mahogany and sapele wraps. These I used a spray urethane on them. The teak ones I oiled.

So make the wood bits first. I used some scrap to test.

From Update 6-8-2011


The holes are for the swivel bolts and nuts. I used nylon bolts and wing nuts from Lowes and Home Depot. Add the rubber washer to hold it from turning. You do not need to tighten them tight as they hold real well.

From Update 6-8-2011


Glue them in with some epoxy (J-B Weld). Then run thru the router to clean them up.
From Update 6-8-2011

From Update 6-8-2011


Wire in the switch then glue them up. Give them a final sand then oil or add desired finish.
Also make Aluminum brackets.
Clamp available here.

From Update 6-8-2011


From Update 6-8-2011


Finished fan.

From Update 6-8-2011


You could make all the cuts for the wood on a table saw, but I used a router for the channel. Also the switch came from Radio Shack. I put it in one of the screw holes for the grill. Drill a half inch hole opposite to insert the switch. This hole is where the wires will come back out.

Friday, February 11, 2011

As they say On Monty Python ........


"And now for something completely different"


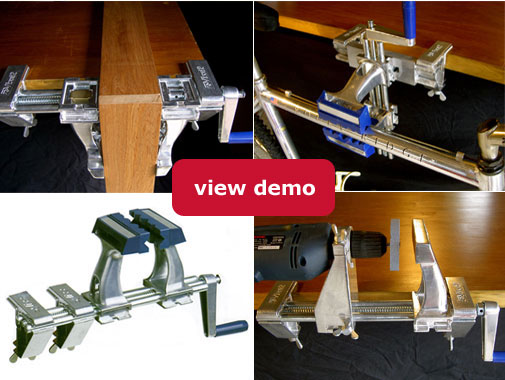
The new tool in the shop. Small but very useful. I wished I bought this before. I got it on ebay ( of course), But actually came directly from the importer.

What is it already!!!

The Swiss made Zyliss vice. The z-vise2 actually.


Check it out for your self.

http://www.homeshow.co.nz/zVise_overview.html

In the US.

http://www.advmachinery.com/p-105-z2-portable-clamping-system.aspx


Here I'm using it on the drill press.
From update-2-11-2011


Actually found a pic of one on a boat. Which is what I really bought it for. I wanted a tool I could use in the backwoods of someplace in the world. Mostly none rusting magnesium aluminum.

http://www.boatus.com/cruising/ithaka/200406-15.asp

How to use.


Part 2